使用遠端的 Git 主機
如果您已在 GitHub (github.com) 或 BitBucket (bitbucket.org) 中使用某個遠端 repository,該方案則很有幫助。在此情況下,您發送更改到該遠端 repository,然後 Plesk 會從遠端 repository pull 這些更改並將其部署到您的網站上。
|
在本小節: |
Clone Git Repository
You can create a Git repository that will be a clone of a remote repository. Go to Websites&Domains and click Git. If you have already created Git repositories for your domain, click the Add Repository button. You will see the screen for creating a new repository:
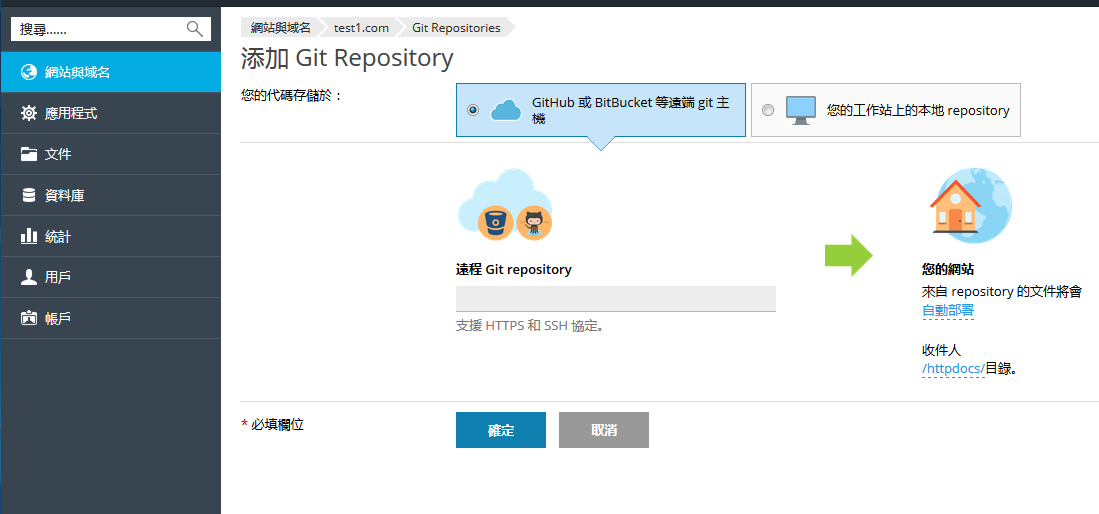
First, you have to select where your code is stored. In this scenario, select Remote git hosting like GitHub or BitBucket.
Remote Git repository. Enter the path to your remote repository in BitBucket or GitHub. You can enter it in either HTTPS or SSH format. HTTP/HTTPS authentication is not supported, so you can use HTTP/HTTPS protocol only if a repository does not require authentication. If a private Git repository is used, you must authenticate with an SSH key generated by Plesk (refer to Use SSH Connection for details).
In the Your Website section, specify the following:
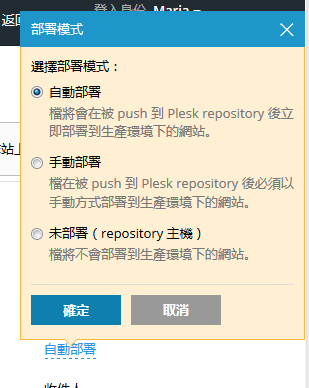
- The deployment mode. By default, the Automatic deployment is used. This means that all changes pushed to the Git repository will be automatically deployed to the production site. If you want to change the deployment mode, click the automatically deployed link and select another option in the opened Deployment Mode window. If Manual deployment is selected, you will need to manually deploy files from the Git repository to your hosting. If No deployment is selected, the files will not be deployed to the production site (this can be used, for example, to store and exchange code).
- A target directory for publishing Git files on your website. By default, the
/httpdocsdirectory is used. You can change it to another existing directory by clicking the directory name.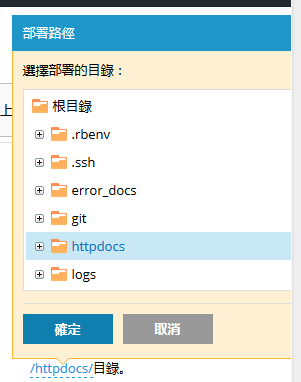
Click OK. Plesk will try to connect to the remote repository and clone it.

After the progress dialog shows that the cloning has completed successfully, the new repository will be displayed on the Git page.
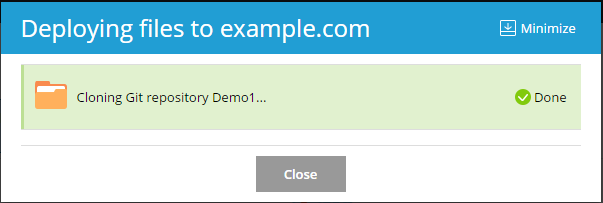
The new repository will be displayed at Websites & Domains > Git. The name of the remote repository will be used as a Git repository name. You can rename the repository later (refer to the Rename or Remove a Repository section).
The created repository is a clone of the remote repository and will be used for pulling changes from it and deploying them to the target directory.

使用SSH連接
您可以使用SSH連接遠端的Git repository。在此情況下,添加新的 repository時,請以SSH格式指定遠端repository的URL。將會出現SSH 公共金鑰欄位,顯示由 Plesk自動生成的SSH公共金鑰。
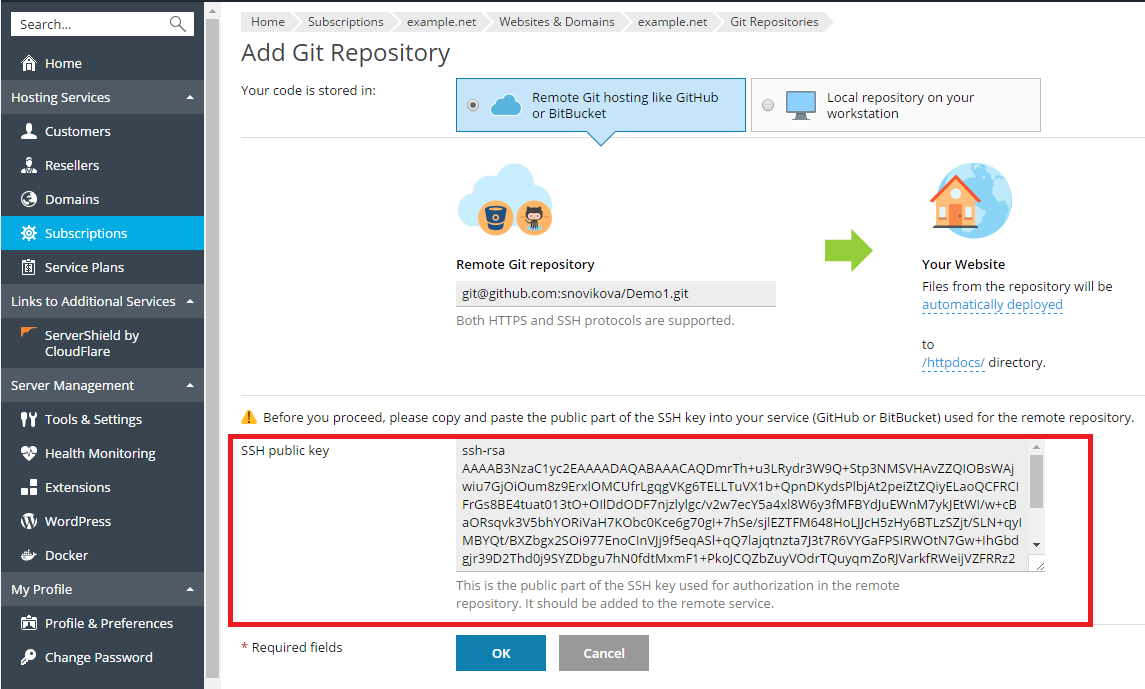
在點按該螢幕上的確定之前,您必須要將該SSH金鑰添加到遠端的Git repository的設定中。詳情請查看為 GitHub 和 Bitbucket 添加 SSH 金鑰的文檔。
Pull 和部署文件
您commit網站文件並將檔push 到遠端的 repository後,進入 網站與域名 點按repository名稱旁的以Pull 方式更新 按鈕。來自遠端 repository 的更改將會被 pull 到克隆的 Git repository 中。
您可以在網站與域名 > Git處看到上一次commit資訊。
默認 Plesk 會使用 自動部署 模式。這表示在檔被 push 到 repository 後,會立即被部署到目標目錄(必要時可禁用該模式,請參閱 選擇部署模式 部分)。
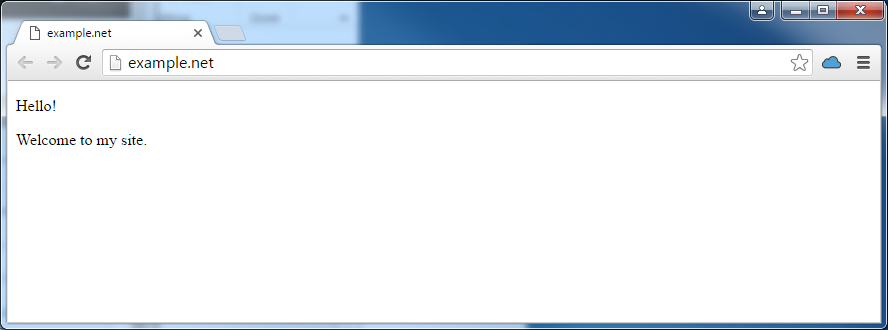
例如,如果已經 pull 一個 index.html 檔(該檔帶有文本 “Hello! Welcome to my site”),則可以立即點按網站 URL 查看更改。
更改 branch 或路徑
從新的 branch 部署
正常不會在一個 repository 中操作多個 branches。一個時間段內只能有一個活動的 branch。默認會將主branch 用於部署。
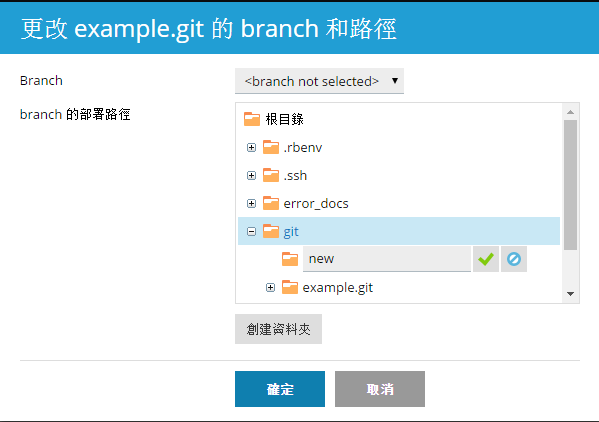
若要添加新的 branch,您需要在遠端 repository 中創建一個 branch 然後 pull 更改。此後,您可以在 Plesk 中的兩個或多個活動的 branches 中選擇一個。進入網站與域名 > Git,點按 更改 branch 和路徑,然後在打開的視窗中於Branch 功能表中選擇branch名稱。
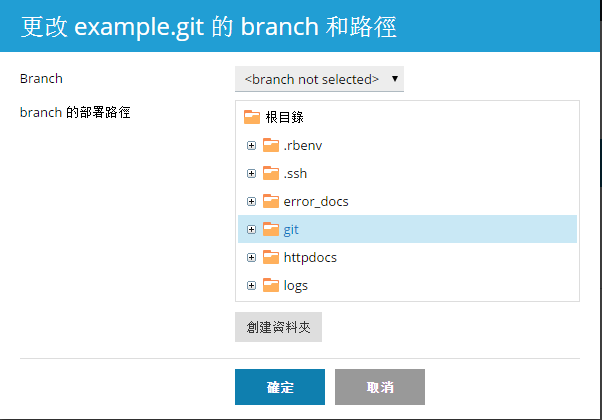
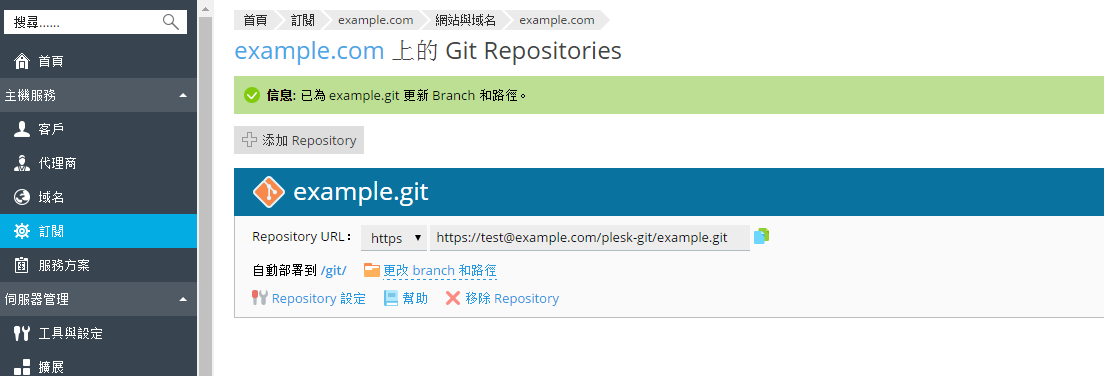
如果您選擇一個新的 branch 並點按 確定,Plesk 將會顯示新的活動的 branch。
更改部署路徑
默認會將 /httpdocs 目錄用於在網站上發佈 Git 檔。如果您想要更改部署路徑,請進入網站與域名 > Git,點按更改 branch 和路徑連結,在打開的視窗中選擇新的目錄。
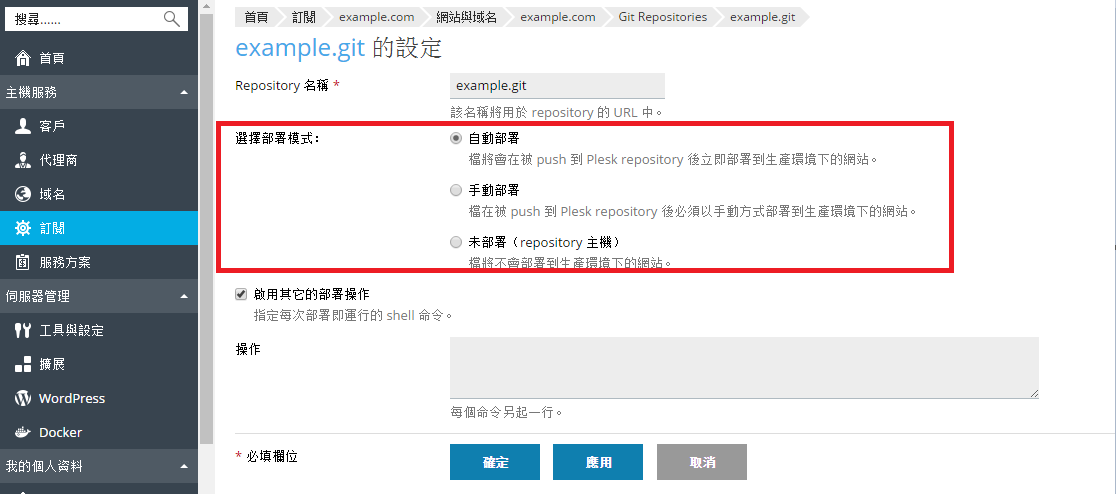
選擇部署模式
您可以為您的 repository 選擇部署模式。進入網站與域名 > Git,點按Repository 設定 並在選擇部署模式處選擇一個選項:
- 自動部署. 如果您希望 Plesk 立即部署所有更改到生產環境下的網站請選擇該選項。
- 手動部署. 您將需要點按 從 Repository 部署 按鈕(在 網站與域名 > Git 下)。您還可以點按 網站與域名頁面上 repository 名稱旁的 Deploy 按鈕手動部署檔。
- 無部署(repository 主機)。在此情況下,檔將不會部署到生產環境下的網站。如果您只是使用 Git repository 存儲和交換代碼可考慮該選項。
將 Webhooks 用於自動 Pull
您可以使用 webhooks 配置您的遠端 repository 以通知 Plesk 有關某些事件的資訊,例如,push 檔到 repository。詳情請參閱管理 BitBucket 或 GitHub 中的 webhooks 的文檔。
會自動為 repository 生成 Webhook URL。若要查看 Webhook URL,請點按 Repository 設定。
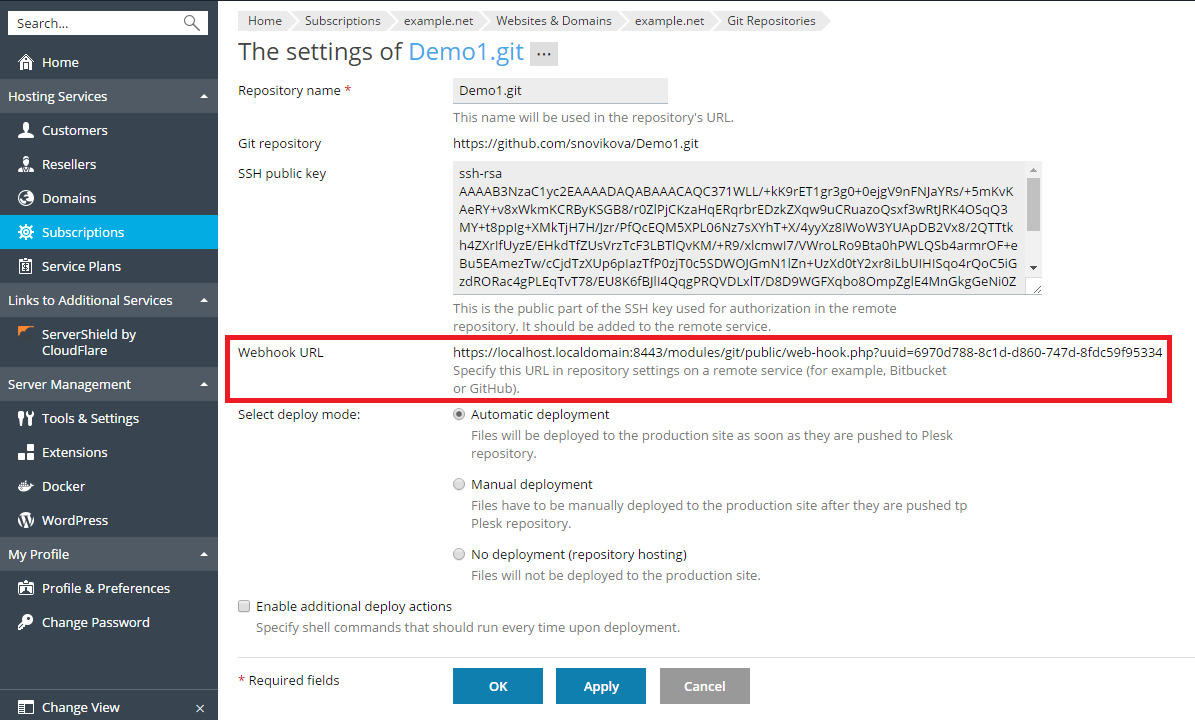
複製 webhook URL,將其添加到您的遠端 repository 並將其配置可在 push 到 repository 的情況下被觸發。因此每次 push 文件到遠端 repository 時,Plesk 都將會通知有關 push 事件的資訊,將會自動 pull 文件,因而您無需再點按 以 Pull 方式更新 按鈕。如果為某個 repository 配置了自動部署,被 pull 的文件將立即被部署到網站。
注意:如果Plesk是通過自簽章憑證保護安全的,如果通過HTTPS協議調用webhook可能會因SSL/TLS握手問題而不工作。如果是此種情況,請在webhook URL中指定 HTTP協議。
啟用其它的部署操作
在很多情況下,檔發佈還不足以完成網站的部署。例如,如果您正使用 Ruby on Rails 等框架,您可能需要在部署後使用如 bin/rails db:migrate 之類的命令運行資料移轉。
Plesk 支援定義每次部署文件到網站後將要運行的其它命令。
進入網站與域名 > Git,點按Repository 設定,選擇啟用其它的部署操作,並輸入一個或多個在每次部署repository 內容時需運行的shell命令。每個獨立的命令各占一行。

注意:如果禁用系統使用者在 Linux 上使用 SSH,所有指定的命令將在 chrooted 環境中運行。訂閱的系統使用者的主目錄會被當做該訂閱的檔案系統根,不會運行 chroot jail 外的可執行檔。例如,如果您網站的路徑是 /var/www/vhosts/example.com/httpdocs,那麼在 chrooted 環境中的路徑則是 ./httpdocs,因此您將無法在超出 /httpdocs 目錄一級的目錄中執行命令。
查看提交日誌
若要查看當前 branch 的整個commit歷史,請進入 網站與域名 > Git,點按Commit 日誌 連結。對於每個提交記錄,將會顯示以下資訊:時間、唯一的識別字、用戶名稱和提交資訊。按一下刷新以更新提交日誌。
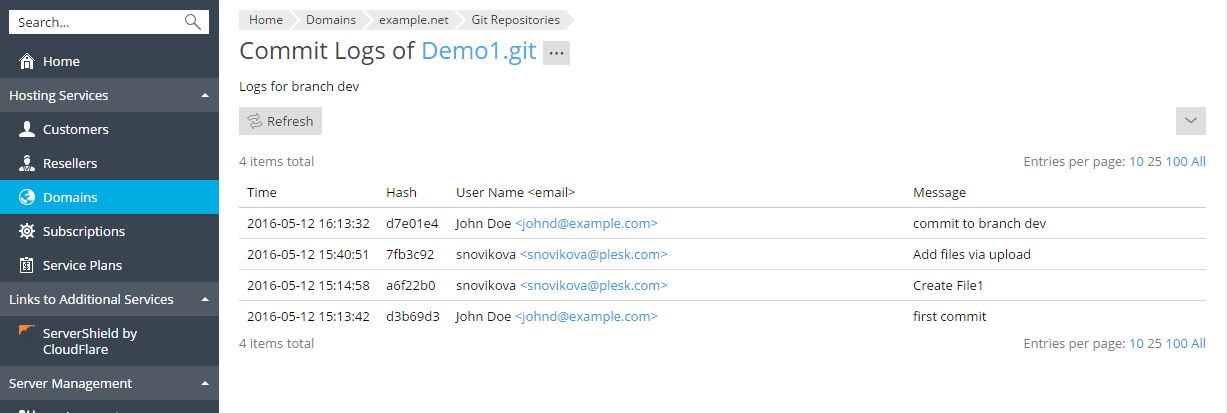
您可以按任何參數過濾提交日誌 例如,您可以找到某個用戶某個日期在哪裡提交的資訊。請點按 ![]() 按鈕,輸入搜尋參數,點按 搜尋。
按鈕,輸入搜尋參數,點按 搜尋。

重命名或移除 Repository
您可以在任何時候重命名 repository。例如,如果您已完成了開發,您可能想要將 repository 名稱從 website-dev 更改為 website 以避免混淆。進入網站與域名 > Git,點按Repository 設定,在 Repository 名稱 欄位輸入新的名稱。
如果您想要移除 repository,請點按 移除 Repository 連結(在 Git 螢幕上)。在此情況下,Plesk 將只會移除 repository,而帶有發佈資料的目標目錄則保持原樣。